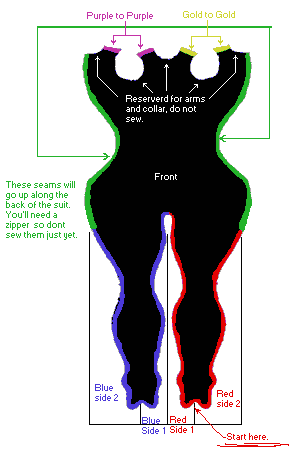
The main body of the suit includes everything from the feet up to the lower neck and shoulders. It is the largest pattern and fairly complicated but it should be done first because it'll be easier to accurately fit the other sections when this is complete.

Make the Pattern

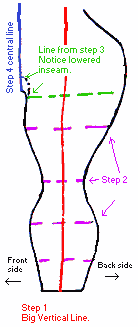
1)It starts with a single long line. Measure from your ankle to your armpit, reduce for stretch and mark it. Now measure the distance from your ankle to your knee, your knee to your inseam, then the top of your pelvis, then to the waist. Remember to reduce each measurement by the same percentage as the first. I'll refer to this as the big vertical line. From this line you can draw all horizontal lines perpendicular (at a right angle) .

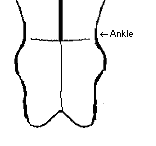
2)Take round measurements of your ankle, calf, knee, thigh, and any other relevant measurement on your leg. For now stay below the thigh. Also don't worry about the foot, it comes later. Mark them each at right angles with a line centered on the first line you drew in their appropriate position on the big vertical line. Once again remember to reduce by percentage.

3)Measure the inseam and mark it across. After this the pattern's getting not-so-symetrical so you choose a front side and a back. First lower the inseam slightly if your a woman and even more for a guy. If it's too tight around the crotch the suit will ride up and/or squeeze you in a baaad way. Now mark it with a curve away from the big vertical line toward the "front" side.

4) From the end of the inseam go straight up. Make sure this line is parallel to the big vertical line. It will go all the way up to the bottom of your neck. This is the central axis line of the costume.

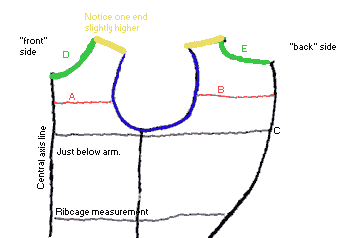
5)Using the location of the pelvis determined in step one measure your pelvis and mark it from the central axis line not centered on the big vertical line. Since we're off the leg and on to the torso this and all following horizontal/round measurements must be divided by 2 before being reduced by the percentage. All torso measurements are also drawn from the central line not centered on the big vertical line.

Now we mark any pattern lines (black in the 1st diagram) we havn't so far. Just connect each round (horizontal) measurement to the next with smooth, flowing lines. Make sure everything below the thigh is symetrical. If you have one, use a flexible ruler. If not try tracing paper or cut out templates.

You should have marked the groin area in step 3, if not remeber to curve it so it comes together a bit like an arch when you make a symetrical transfer.

When connecting the inseam to the pelvis on the "back" side of the pattern you have to allow some extra space for your rear. First draw a horizontal line from the adjusted inseam (like the green line in the diagram). Now measure the distance from directly below your crotch to the very base of your spine. The curve from the adjusted inseam line to the pelvis line should be just slightly shorter than that. If it's far too small bubble the curve out a little.

The pattern will look unusually full in the hips, but that's okay, it should. The pelvis is where leg and torso meet and two seams become one so this actually accomidates the pelvis' contours in the pattern.

6)From the pelvis up continue measuring and marking for your waist, bottom of the ribcage ect. untill you reach the point on your chest just beneath you arms. Mark the vertical position of the bottom of your neck. One last reminder to apply percentage reductions for both vertical and horizontal measurements and all the horizontal stuff had to be in half.

7) Now come some tricky measurements. First measure from arm to arm, not shoulder to shoulder but the very front of your chest, the points between your armpit and shoulder. Mark it's vertical position but just note down the horizontal measurement. Now try it with your back.

This is a difficult measurement. I'll tell you now, it's not entirely neccessary but it is good to have. You need to take measurements with your body in a fairly neutral position, not stretched, flexed or scrunched. If you have somebody assisting you it should be no problem. If you're going solo try holding the measuring tape in place with a bit of masking tape or tie a string around one shoulder, draw it across and measure the string. A little inginuity and you should get it. If not you can probably wing it.

Now a few more measurements, measure around your neck, around your shoulder and the top of the shoulder, that is, from the side of your neck to where you shoulder meets your arm (try to find the shoulder bone).

The next few marks and measures are a little strange. Their positions relative to one another are hard to define clearly. You may have to shift then around slightly several times before they come together. It's a little like a puzzle. Just think it through and have several colors of pen and marker.

8)Mark the arm to arm measure, first measurement in step 7, horizontally from the center line (line A. in the 2nd diagram).

9)Now draw a curve equal to the round measure of your shoulder. The bottom of the curve should touch the "just below arm" (armpit level) line. The side of the curve should touch line A. The ends of the curve should be near vertical.

10)The second measurement, the one from step 7 that was such a bitch to get is drawn on the other side of the curve as if it were an extention of line A. This is line B.

If you couldn't get that measurement assume that it's just a little farther from the central line than the end of the "under the arm measurement" (point C). If you have really huge shoulders you may need to overcompensate (note: this is theory. I'm not 100%)

11)The two gold lines are equal to the top of your shoulder measure. They should start at the ends of the curve and angle slightly upward because the side of your neck is slightly higher than your shoulder.

12)Now the neck curve on the "front side". Take your neck measurement (divided by two, of course) and divide it into unequal parts. For example your neck is 16 inches around divide by 2 and get 8, then cut 8 into 5 and 3. The larger share of the two will go in the front (curve D). The back of the neck is a little higher than the front. Draw a straight horizontal line acroos from the base of the neck (the very bottom of curve D). Now move an inch or two higher, use your judgement and draw curve E from that point. Both these curves connect with their respective gold lines.

If you're making the suit particularly tight you may want to reduce the neck by a smaller percentage than the rest of the horizontal measurements so it's not so tight. You don't want this suit to be too tight around the neck.

13) Everything should fit together.

Probably won't.

You can bend the shape of the arm curve and neck curves a bit as well as tweak the angle of the shoulder lines and keep making minor adjustments untill it all comes together (work in pencil). The shape can change slightly but the measurements must remain the same. A little persistance and thinking should bring everything together.

14) The feet are fairly simple. measure the distance from your ankle, going under your heel, to your toe. Then move down marking the round measure of your foot at the ankle, the middle of the foot and near the toes. The end of the foot has to make a double point shape so it fits around your toes properly (third diagram). This type of foot causes a slight wrinkling around the ankle when worn but it still fits well.

15) Double check, or at least double think all you measurements and calculations. Don't just think of things as lines on paper. Think of them as representations of your form, your body. Everything should make sense and come together in a logical manner. Read the "Sewing it Together" section to help you envision how it comes together.

16) If you neglected any pattern lines fill them in. Remember, smooth natural curves corresponding with your body.

Trace a seam allowance all around the pattern Except the central line (step 4, it should go from the groin to the neck). Then cut to complete the pattern.

Sewing it together

You should look over the tips and option section for information on sewing with spandex if you've never done it before.

1) Lay the uncut cloth on a large flat surface and try to make it as flat yet unstretched as possible. Use tape, thumbtacks or pins to keep it in place and keep it from bunching or wrinkling. Transfer the pattern to the fabric once, flip it over on the axis line and carefully transfer it again. When you cut it should look something like the final, colorful diagram above (on the right).

This diagram is color coordinated. Ther idea is you sew every edge to the edge of the same color. One half of the red leg goes to the other half of the red leg, one side of the blue goes to the other side of the blue. One green joins the other ect. ect.

2) Start with the notch between the two curves on one leg. Fold it together and start pinning Red Side 1 to Red Side 2. Work your way from the notch to the groin joining one side of the leg to the other. Pin all the way up before you start sewing. Now start sewing.

Whatever you do DO NOT sew the blue side to the red side. Sorry to be obvious but this is important.

3) Now do the same with the blue side. Start at the middle of the foot and work your way up.

4) You should now have two legs complete. Next do the shoulders gold side to gold side and purple to purple

Now would be a good time to give it a test fit. Hold the back (the green lines)closed with safety pins and try it on.

5, sort of) Don't sew the back together yet, at least not all the way. If this suit's going to have a back entry you need to put in the zipper. If it's going to have a collar or mask those should go before the zipper. Zippers and how to install them is discussed in the options + tips section.


Back to How to Make a Skinsuit

Back to costumes page