
Included here are instructions on how to make plans and patterns for and eventually build a full coverage bodysuit to your personal specs. It breaks down into three major sections.
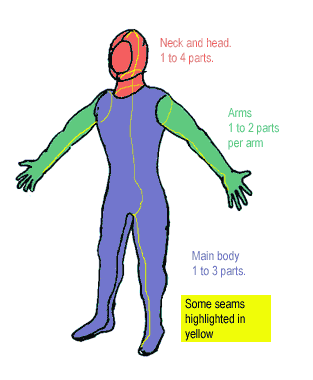
1) The Main Section- Unlike many other bodysuit patterns this has no side seams on the torso/leg part making it look better and slightly easier to sew, the pattern is slightly more complicated though. The entire thing is one piece and one pattern with seams going from the each foot to the crotch, from the crotch to the back of the neck and a short seam on each shoulder. A zipper will also be needed, most likely in the back seam and hemmed cuffs if it's footless. I may also refer to it as the "main body", "main pattern", "main portion", "main suit" ect.
2) Arms - One simple piece with cuff if it's without attached glove, or a more complicated two piece with glove. 1 seam and it attaches to the main body around the shoulder.
3) One piece for the neck. The full attached hood pattern I use is three more pieces. This does not count faceholes, eyeholes and other extras.
Terms- Some terms I use interchangeably such as:
skinsuit, catsuit, bodysuit, leotard, suit
spandex, stretch fabric, cloth, material, fabric (even though spandex is a specific type of fabric I use it interchangeably in this case.)
Some words need clarification, this is intended for the lightly experienced so I'll go over some basic terms. Also, I'm unfamiliar with the myriad of technical sewing and costuming terms so I make some terms up.
Pattern: A piece of paper in the shape you wish to cut your fabric. It's incredibly difficult to design sections of material without patterns. Simple enough.
Transfer: To mark the shape of a pattern onto the cloth before cutting.
Section (of material): A piece of material that's been transfered and cut into the shape of a pattern but not sewn to anything. I will sometimes call it a piece or part.
Seam: Where two sections meet and are sewn together (This is really basic, I know.)
Symetrical patterns/ transfer: AKA half patterns. Since the body and many parts of it are symetrical it's common practice to make a pattern that can be used to mark one side of the fabric section flipped over and used to mark the other side of the section.
Circumfrence or round measure: To measure around a body part. Remember if you're round measuring for a half pattern divide by 2.
Reduction, percentage: Since spandex stretches the way to get a close fit is to have the pattern slightly smaller than your measurements. This is accomplished by reducing all measurements by a fixed percentage, not a fixed length. Every fabric has a different amount of give so this reduction can be anything from %3 to %25. Some fabrics may stretch more in one direction than the other so you might use two different percentages, one for horizontal, one for vertical. This important factor varies on how you want the fit and the type of fabric so consider it extra carefully.
You can reduce most easily with a calculator, say your reducing by 5%. You take whatever you waist measurement is, say 25 inches, and multiply it by .95 (the same as 95% of the original). Then take your chest measurement and multiply by .95 keeping consistent throughout the whole pattern.
Seam allowance: After you make a pettern you should trace about 1/8 or 1/4 inch out side of it to allow space for the seams. The center line of a half pattern is not a seam so don't make seam allowance there.
Make sure you go through all these instructions first. Though I've gone step-by-step in some places you'll need some foresight and a master plan and must think several steps ahead. I even suggest looking for more info on the internet, there are other tips, tricks techniques and opinions. I'll put a few links in the "Tips and Options" section.
It's probably a good idea to print all these instructions out so they're close by when you're working.
Don't rush it. This isn't a highly complicated project but some skills should be developed before you begin. This isn't a super-easy-no-hassle-in-a-minute plan from Family Circle. Sewing is about turning planar geometry into solid. If you're no good at thinking in terms of 3-D objects measure carefully, double check your work and, maybe, try to get some assistance. If you don't know how to use a sewing machine, practice. Stretch fabrics are trickier to sew than rigid ones so practice on some stretch fabric scraps. Learn the right adjustments for the stretch stitches. More on this is available in the "Tips and Options" part.
Make sure you've gathered all your supplies and have them at hand before you start designing the pattern or sewing the bodysuit. Most of the pattern supplies are applicable to designing any pattern from scratch.
Measuring Tape: Needed to take the various measures of your body and nonlinear parts of the pattern.
Large Ruler
Felxible Ruler (optional yet recommended): This is a ruler with a lead core and a thin measuring tape on either side sealed in plastic. It can be bent into a curve and still give accurate measurements.
Right Angle: A biggish one is better so you can keep working when you've misplaced your ruler.
Calculator: For a tight fit spandex has to be cut to measurements smaller than your body measurements. A calculator will save you from messing around with percentages and fractions all day.
Mirror (optional): Measuring yourself while looking in a mirror helps you align the measuring tape correctly.
Paper: Special large sheets of pattern paper are available at sewing supply stores. These tend to be thick enough to handle a lot of use and some types are pre marked and measured. If you're working on a budget use cheaper brown postal wrap paper or old newspaper which is nearly free. If you use newspaper you'll need some tape to reinforce it in many places and join the many pages you'll be using.
Tape: I suggest a medium-narrow masking tape if you're holding newspaper together. Clear tape around the final outline will increase the life of a pattern made from newspaper and won't hinder you from cutting along the line because it's transparent.
Markers: Several colors. You'll need many colors to distinguish measurement lines from pattern lines and when you correct yourself and want to identify correct lines from incorrect. Cutting the wrong line is a time consuming mistake.
Scissors: To cut the final pattern.
Space: The main part of the skinsuit will be nearly as large as you are and the paper will be larger. You'll need space to spread your paper down and more to maneuver around it.
Fabric: You should need a length about equal to your height plus half a yard. I'd strongly suggest a fabric with four way stretch. It should stretch to at least double it's normal length one way and have good stretch the other. Four way stretch is sort of a misnomer. If cloth stretches vertically and horizontally it's called "four way stretch". Two way stretch will only stretch vertically or horizontally. Avoid the 2 way stuff.
Also consider the look, texture and thickness of the cloth. It's usually okay to touch merchandise at a fabric shop so make sure you get the right stuff. Be certain to check for runs. Some cheaper stretch fabrics will run much like women's pantyhose. Look at the cut end of the fabric and search for runs. Pick at the edge and stretch it a bit to be certain it doesn't start unraveling. Fabric with the tendency to run slightly is still useable if you do the seams very well. Fabric that runs easily should not be used. There may be fabric that runs when stretched the long way and is prevented from that only by the finishing on it's edges but I can't think of any way to detect it in the store.
Sewing Machine: You need something that can handle stretch stitching. Most mini sewing machines can't. My machine was moderately priced and can use the "straight stretch stitch" and sturdy "stretch overedge stitch". I'd recommend against using the zig-zag stitch because it tends to be highly visible and puckers when pulled. Check your machine's manual to see what's what.
Scissors: Spandex and stretch materials are resiliant. Make sure those scissors are sharp or you'll just be chewing on the fabric.
Thread: Don't use anything that breaks with a casual tug. A quality thread is required to withstand the strains of stretching. Elastic thread is sold but I'm no big fan of it. Stretch stitches should be sewn with a non-stretching thread.
Pattern: Of course.
A means to mark the fabric: To transfer the pattern to cloth. Applying pressure to stretchy fabric causes it to distort so using chalks or pencils is tricky. I'd suggest small tipped markers and possibly tape.
Masking Tape (optional) : You can't use markers on dark colored fabric so you can copy the pattern roughly in masking tape then draw over that. It's tedious going over everthing twice but sometimes it's the only way to get it right. Taped spandex is also a bit easier to cut. It also tapes the cloth flat to the floor when you transfer the pattern.
Pins: Stretchy fabrics should be lined up with pins (or those clippy things) along the seam before sewing. Can be used to pin cloth to the floor.
Needles: For little details that need to be hand sewn and burying those thread ends that are left over when you machine sew.
Zipper(s): Assuming you want to wear the thing once it's made.
If you've never sewn with this pattern before don't try it with the most expensive fabric around.
You'll probably have to strip down to your underwear or get nekkid to get the right measurements. It may not seem important now but take it into account.
You also have consider the possibility that you are highly unattractive in spandex before you undertake this type of project. Hey, some people are, so use your better judgement.
I apoligize for any poorly edited or ambiguous instructions. I tried to be a thorough as possible, to an almost annoyingly "For Dummies" book extent in some spots but I'm sorry if there's too much or two little in some areas.