The collar has to be the circumfrence of your neck and not reduced too much, you dont want it too tight. It's pretty basic.
This diagram shows a half pattern, you'll need to symetrically transfer it.
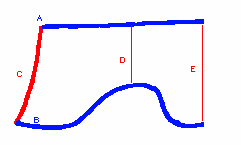
Line A is the round measure of the top of your neck, where your head meets your neck. Line B is curved for two reasons. First it must equal the measure of the neck in the main body section, second it matches the up and down countours around your neck and shoulders when the main body is worn.
The distance between the bottom of Line C and Line E should be half the round measure of the lowest portion of your neck so that when the pattern is transfered symetrically it's the circumfrence of your neck. Everybody's built differently but line C would probably taper near the top of the neck. Line C represents the distance from the top of your neck to the back of the suit, Line D the distance fron the top of the neck to the shoulder of the suit, Line E top of the neck to the front of the main body suit.
The hood is three parts made from 2 patterns. Remember to apply percentage reductions to all measurements.
1) The first part is a roughly oval panel covering the face. from side to side it should be a bit wider than the distance between the outer corners of your eyes, up and down it should be from just above your chin to the center of your forehead. It can be slightly tapered on one end to better match the shape of your face. If your nose is on the pointed side make it a little wider at nose level so you don't get uncomfortable pressure on the tip of your nose.
Much of the other pattern is based around this first one so you'll have to remember roughly where it would be located on your face, where its top and bottom points will reach, ect.
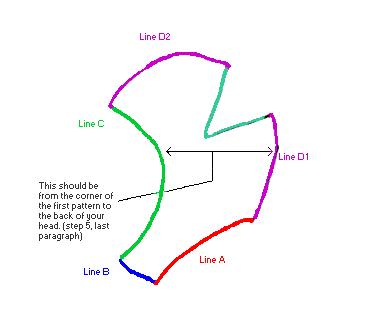
2) the part covering the sides of the head and chin are more complicated. It's almost all curved lines and their exact positions will require some experimentation to find. You may want to take the all the measures first before trying to put the lines together on paper. The first line is a slightly curved line where the neck is(Line A). This line should be half the round measurement of the top of your neck (try to match it to the collar pattern). This pattern is meant to be transfered twice, once on one side then once in reverse.
3)Line B is a slightly curved line equal to the space under your chin. It goes from the front of your neck to where the bottom of the pattern in step one would be.
4)Line C is equal to half the measure around the pattern made in step one. This is where the two side parts join the face part. It should be curved but not nearly as curved as the sides of the pattern made in step 1.
5)Lines D-1 and D-2 are the measure from where the top of the pattern from step one would go, over your head and to the base of your skull.This is divided into two curve of roughly equal length (about where the back of your head becomes the top of your head. They are seperated by a two line "wedge" so when sewn together it becomes a roughly spherical shape.
The two straight lines must be equal in length and about half the distance from one ear to the other measured aroung the back of your head.
Line Line D-1 is fairly straight. If you measure around your head at about ear level, subtract the measure of the pattern from step 1 at it's widest horizontally (also about ear level) and divide by 2 you'll know about how far the top of Line D-1 should be from Line C. Line D-2 can be more curved.
Now like I said this is the kind of thing that can't be done with exact instructions. By adjusting the curvature and placement of line measures A through D and the angle between the two straight lines it should come together to resemble the diagram. Read the construction part to see how it wraps around your head when finished to help you understand the proportions and measures of the thing.
I'm sorry if these instructions are hard to follow but it's an oddly shaped pattern.
Fabric Ring Holes
The holes made with a fabric ring seem to keep thier shape the best and look very nice. They make the best mouth holes.
1) You start by drawing a pattern of the shape and size you want the hole to be, you can do this freehand easily. To make the closest fitting mouth hole just make it a single line. Keep in mind that the hole will be slightly larger than the pattern.
2) Draw an outside perimiter about 1/2 an inch around the shape you drew for the hole.
3) Put a small seam allowance on the outer and inner edges (unless it's just a line like the mouth hole).
4) Copy the piece to fabric and cut it out. Using the pattern cut out a hole in the mask in the appropriate spot. Sew the inner edge of the ring to the outside of the mask using a straight stretch stitch.
5) Turn the ring around so that it's inside the mask, sew it to the mask using a narrow zig-zag stitch.
Folded Edge Slit Holes.
Folded edge holes are pretty easy to make and are good for eye holes.
1) Cut a slit in the mask the length of the hole you wish to make. At the each end or the slit round it off, like a tiny tear-drop shape.
2) Hand sew the ends (teardrops) Into the inside of the mask (it's very difficult making that turn on a sewind machine).
3) Fold the edges of the slit over and sew with a straight stretch stitch or a narrow zig-zag.
4) For eye holes hand sew the slit back together between the eyes to get two narrow eye holes.
Balaclava / Open Face
The balaclava is basically the same as a large fabric ring opening. The only difference it that between the ring and the mask you have to put a piece of non-stretching cloth or a thin, strong length of cord. If you don't the mask opening is liable to stretch over your entire head and try to become a collar. The opening must be totally unable to fit around your entire head.
1)You'll need 1 piece of fabric marked and cut from the pattern in step 1 and two pieces marked and cut from the pattern made in steps 2 through 5. Remember to flip the pattern over because one of these pieces should be the mirror image of the other.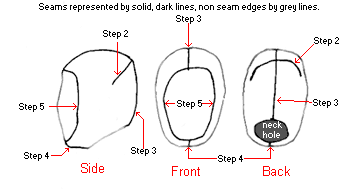
2)On each of the side-of-the-head patterns sew the straight lines together merging Line D1 and D2 into a single line.
3) Sew one of the newly unified D lines of one side-of-the-head piece to the other reunified D line on the other side of the head piece.
4) Now sew the Line B of one side to the Line B of the other side.
5) Now attach the face piece (step one in the pattern section) to the other two parts. Make sure you're attaching it to the face end, to the two line C's and not to the neck (Line A).
You should be using pins to be keeping things aligned but it's especailly important in step 5. find the top and bottom of the face piece and line them up with the seams on the two side pieces and work your way out from there.
The collar should be attached to the main body first, aligning the back of the collar with the back seam of the main body. Then the mask should be attached, back seam to the the back of the collar.
If you are making a detached mask/hood do not make the bottom of the collar (Line B in the collar section) in a wave pattern. Make it a straight line and slightly tighter. Then make a collar for the suit in the fashion described above so the mask collar can be tucked under the suits collar.
I might cover eye/mouth/face holes and the like at the next update
