The first two steps of making the sleeve define it's vertical proportions. If you're making a sleeve with stirrups or attached glove you can reduce these measurements slightly (5% or less) for a better fit. Don't over-reduce. This pattern is based around a central line. If you want to make it smaller you can make a half pattern and flip it over when you're transfering it to the cloth.
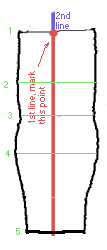
1) It starts with the measurement from inside your armpit to your wrist. This makes the first line, mark it with a little slash at each end, this measurement will be important later.
2) Now measure from your wrist to where the shoulder seam of the main part of the suit ends. If you've finished the first part you can hold the back together with a safety pin and test fit for best measurement. This new measurement should be slightly longer than the one you took before. Mark the difference between the two as an extension of the first line.
Now come the basic horizontal measurements. These can be reduced by a percentage equal to the percentage you reduced the horizontal measurements of the main body section.
3)Now take a measurement around of the area above your bicep just beneath your armpit and draw it centered on and perpendicular (at a right angle) to the top of the first line where you marked it (on the diagram it's the line next to the Light green #1) . Now measure your wrist and mark it down (light green #5). Now mark the round measurements of your bicep, elbow and forearm (light green numbers 2, 3 and 4) using their relative distance from your armpit or wrist to figure out where to mark them vertically. Remember if you reduced the vertical line in steps 1 and 2 the vertical placement on these lines should be reduced by the same percentage.
4) Draw a flowing line connecting the ends of each measurement. You may want to only do one side so you can cut it later, fold it over and draw the other side so it's perfectly symetrical. What ever you do don't cut anything yet. There's still some more to go.
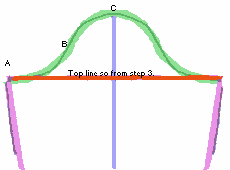
The Shoulder Curve
In order to fit properly the shoulder part of the pattern is shaped differently than you might expect.
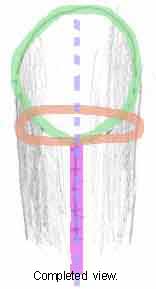
5) Measure the part of your main body pattern that goes around the shoulder. In the final product this will be sewn together with the green line in the second diagram. This curve should be symetrical so if you have a flexible ruler it's invaluable now, otherwise use tracing paper, a cardboard template or do one side (with half the shoulder measurement) and fold the pattern near the last step. The curve should be nearly horizontal at point "A", almost, but not quite vertical around point "B" and horizontal at point "C". When sewn the green line will form a circle as seen in the 3rd diagram coresponding to shoulder of the main body.
6) if this sleeve ends at the wrist extend the wristcuff by half an inch so you can fold it over and hem it.
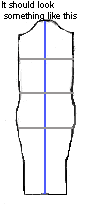
7)Now trace a seam allowance around the pattern. Cut one side of it and fold it along the vertical line to see if it's symetrical. If everything checks out complete cutting and you have your pattern.
If you're making a suit with attached gloves only complete the first section up to step 5. You'll probably need to make a pre-pattern, a smaller part of the pattern that will later be transfered on to the main pattern. I may be possible to do it all at once but in this example we use the pre-pattern.
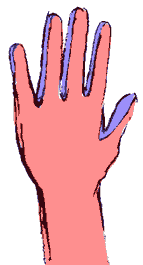
1) It all starts with that gradeschool favorite, the ol' hand turkey (represented by the black line in the diagram). Don't spread your fingers out too far. The tips of the fingers should be between one and two inches apart, depending on your finger length. There's no reason to draw a beak on it but if it makes you feel better I can't stop you.
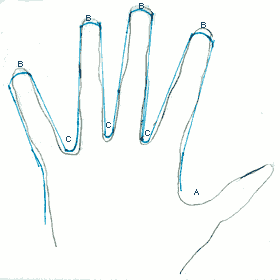
2) Now it's time to clean up the hand turkey. In the diagram the clean up lines are blueish. The thumb is handled in a different fashion than the rest of the fingers so ignore it for now (diagram part A). Mark the tips first with smooth semicircular curves (diagram part B). Notice how the the finger tips come just a little short of the ones on the original hand-turkey. Since the fabric is made to stretch this will improve the fit. Now draw the inside curves (diagram bit C) between the fingers. These shouldn't be sharp angles or else they will be difficult to sew. Now connect the inside curves to the fingertip curves with straight lines plus lines for the outside of the index and pinky finger. If you placed your curves right all these lines should be slightly outside the hand-turkey.
3) A line from the tip of the in index finger to where the thumb meets the hand (point D on the following diagram) is marked. It slopes out smoothly then turns abruptly upward.
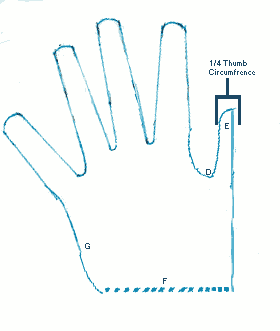
4) Now we draw the part for the thumb. Measure around your thumb. The thumb part of this should be as long as your thumb and 1/4 the circumfrence of your thumb. It starts with a straight line almost parallel to the index finger to a gentle outward curve (point E) then a line straight down. This straight down line should measure from the tip of your thumb to your wrist. This is a central line.
5) Line "F" is equal to half the round measure of your wrist (it should measure up to the wrist in the sleeve pattern) and Line "G" curves slightly outward with the curve of your palm and meets line "F". Measure across you palm to determine how curved line "G" should be.
Your going to have to redraw the lines a bit so everything will come together in the end. Just remember that line "F" must be perpendicular to the center line. Don't go too crazy if things dont measure perfectly. Small inconsistencies should stretch into place. Close should be good enough.
6) Give it a thin seam allowance and you now have the pre-pattern. Double copy it symetrically to the wrist end of the sleeve and you're almost done.
You see, if you folded the pattern up like this and sewed it the fingers your be a bit too tight and the thumb would only be half the size you need it. There's one little piece to go.
7) What's required is a long strip of fabric going between the two halves of the glove. Start by measuring your hand pattern from the outer base of the pinkie all the way to the base of the thumb (point "D"). Measure up and down each finger with a measuring tape to get the entire distance of the outline of your hand.
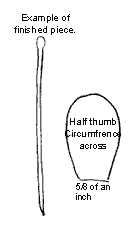
8)It's impractical to make an entire pattern that's so long and thin. You just have to make an oval shaped pattern about the height and 1/2 the round measure or your thumb at it's widest point. It's base should be 5/8 if an inch across. On the back of this tiny pattern write the long measurement you got in step 7 and "by 5/8 of an inch". When you copy the pattern to cloth lay down a strip of masking tape, draw two parallel lines 5/8 of an inch apart and as long as that first measurement and trace the tiny oval pattern at one end. If you did it right it should bear a resemblance to a sperm cell though for this we're calling it "the strip". Use scissors to clip the end to a point.
Constructing the hand.
9) The hand is a very complex shape. It's almost impossible to keep it aligned with pins so you'll loosely sew it by hand in preparation. The hand stitching (I mean stitching by hand, you know what I mean) dosn't have to be at all good. The stitches could be more than an inch apart on the sides of the fingers. It's only on the finger tips an near the knuckles that the stitches need to be closer together. Start by stitching the bulb end of the strip to the thumb and follow the edges of the fingers.
10) Now that the strip is loosly stitched to the main part of the glove you can sew it. If you start at the point end of the strip, near or on the pinky, and keep the strip on top, directly under the sewing machines presser foot, you can make the entire glove in one seam, up the pinky, up and down the top of the fingers, round the thumb, up an down the bottom of the fingers to the side of the hand and all the way down the arm.
11) When the arm is attached to the main body portion make sure the seam on the arm is at the point farthest from the shoulder seam of the main body.
Notes
When you hand stitch the glove in stage nine try to use a cheap, brittle thread in a contrasting color. After it's sewn it's no longer needed and will be easier to pick out and remove this way.
These gloves are unbiased, useable for left or right hands. This pattern may not be suitable for gloves of a stiffer fabric but with stretch fabrics they give total range of motion and should fit well.
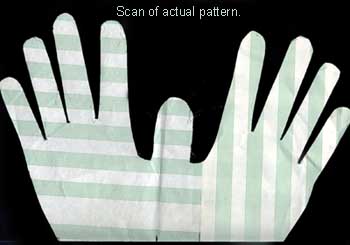
Scan of hand complete hand pattern and sketch of a finished glove with main pattern in red and the strip part in blue.
Hand stirrups subsection coming soon.
